Difference between revisions of "Shopify Integration"
Dzhamalova.r (talk | contribs) (→Settings) |
|||
| (22 intermediate revisions by 3 users not shown) | |||
| Line 1: | Line 1: | ||
| − | + | <div style="float:right;">__TOC__</div> | |
| + | <html> | ||
| + | <iframe width="560" height="315" src="https://www.youtube.com/embed/9kXa4MPCSlA" frameborder="0" allow="autoplay; encrypted-media" allowfullscreen></iframe> | ||
| + | </html> | ||
| + | <br> | ||
| + | <br> | ||
<br> | <br> | ||
| − | |||
| − | |||
| − | |||
==Introduction== | ==Introduction== | ||
| − | Integration with Shopify will allow you to use HandiFox for order fulfillment through the use of Picking and Packing feature. Products listed on an order can be scanned into the pick list to ensure that correct articles and quantities are shipped (see [[Picking and Packing]] and [[Barcoding]]). Once the order is picked and packed, HandiFox will mark the Shopify order as fulfilled | + | Integration with Shopify will allow you to use HandiFox for order fulfillment through the use of Picking and Packing feature. Products listed on an order can be scanned into the pick list to ensure that correct articles and quantities are shipped (see [[Picking and Packing]] and [[Barcoding]]). Once the order is picked and packed, HandiFox will mark the Shopify order as fulfilled, and an invoice will be generated in HandiFox. |
==Setting up the Integration== | ==Setting up the Integration== | ||
| Line 28: | Line 30: | ||
[[File:Hfo-web-shopify-setup-step2.png|thumb|none|800px|Shopify integration wizard in HandiFox Online - step 2]] | [[File:Hfo-web-shopify-setup-step2.png|thumb|none|800px|Shopify integration wizard in HandiFox Online - step 2]] | ||
<br> | <br> | ||
| − | In Shopify, fill in the ''name'' and set the ''permissions'' for the private app, as shown on the page. Click ''Next''. | + | In Shopify, allow custom app development if required. Next, fill in the ''name'' and set the ''permissions'' for the private app, as shown on the page. |
| + | |||
| + | Make sure the '''admin API permissions''' for the app are set as follows: | ||
| + | |||
| + | <table style="border: 1px solid black; border-collapse: collapse;"> | ||
| + | |||
| + | <tr> | ||
| + | <th style="border: 1px solid black; padding: 3px;">Permission</th> | ||
| + | <th style="border: 1px solid black; padding: 3px;">Access Level</th> | ||
| + | </tr> | ||
| + | |||
| + | <tr> | ||
| + | <td style="border: 1px solid black; padding: 3px;">Assigned fulfillment orders</td> | ||
| + | <td style="border: 1px solid black; padding: 3px;">Read and write</td> | ||
| + | </tr> | ||
| + | |||
| + | <tr> | ||
| + | <td style="border: 1px solid black; padding: 3px;">Customers</td> | ||
| + | <td style="border: 1px solid black; padding: 3px;">Read and write</td> | ||
| + | </tr> | ||
| + | |||
| + | <tr> | ||
| + | <td style="border: 1px solid black; padding: 3px;">Draft orders</td> | ||
| + | <td style="border: 1px solid black; padding: 3px;">Read and write</td> | ||
| + | </tr> | ||
| + | |||
| + | <tr> | ||
| + | <td style="border: 1px solid black; padding: 3px;">Fulfillment services</td> | ||
| + | <td style="border: 1px solid black; padding: 3px;">Read and write</td> | ||
| + | </tr> | ||
| + | |||
| + | <tr> | ||
| + | <td style="border: 1px solid black; padding: 3px;">Inventory</td> | ||
| + | <td style="border: 1px solid black; padding: 3px;">Read and write</td> | ||
| + | </tr> | ||
| + | |||
| + | <tr> | ||
| + | <td style="border: 1px solid black; padding: 3px;">Orders</td> | ||
| + | <td style="border: 1px solid black; padding: 3px;">Read and write</td> | ||
| + | </tr> | ||
| + | |||
| + | <tr> | ||
| + | <td style="border: 1px solid black; padding: 3px;">Products</td> | ||
| + | <td style="border: 1px solid black; padding: 3px;">Read and write</td> | ||
| + | </tr> | ||
| + | |||
| + | <tr> | ||
| + | <td style="border: 1px solid black; padding: 3px;">Third-party fulfillment orders</td> | ||
| + | <td style="border: 1px solid black; padding: 3px;">Read and write</td> | ||
| + | </tr> | ||
| + | |||
| + | </table> | ||
| + | |||
| + | The remaining permissions can be left unchecked. | ||
| + | |||
| + | Click ''Next''. | ||
===Connecting the App=== | ===Connecting the App=== | ||
| Line 35: | Line 92: | ||
[[File:Hfo-web-shopify-setup-step3.png|thumb|none|800px|Shopify integration wizard in HandiFox Online - step 3]] | [[File:Hfo-web-shopify-setup-step3.png|thumb|none|800px|Shopify integration wizard in HandiFox Online - step 3]] | ||
<br> | <br> | ||
| − | After the private app creation is complete is Shopify, you will be able to see its ''API Key'', the ''Password'' and the ''Shared Secret'' required for the connection. Copy this information into HandiFox. You will also need to enter your ''store's name'', as seen in the address bar | + | After the private app creation is complete is Shopify, you will be able to see its ''API Key'', the ''Password'' (Admin API access token), and the ''Shared Secret'' (API secret key) required for the connection. Copy this information into HandiFox. You will also need to enter your ''store's name'', as seen in the browser's address bar. |
When you have finished filling in the connection info, click ''Test Connection''. If the test is successful, click ''Next'' to proceed. Otherwise, double-check the entered data and make sure everything is correct. | When you have finished filling in the connection info, click ''Test Connection''. If the test is successful, click ''Next'' to proceed. Otherwise, double-check the entered data and make sure everything is correct. | ||
| Line 45: | Line 102: | ||
<br> | <br> | ||
| − | Now you need to fill in the integration settings which affect how products and orders from Shopify will be loaded into HandiFox. These settings will also be available in the ''Shopify Panel'' of HandiFox once the integration is set up. See below if you need details on what each of these settings does. | + | Now you need to fill in the integration settings which affect how products and orders from Shopify will be loaded into HandiFox. These settings will also be available in the ''Shopify Panel'' of HandiFox once the integration is set up. See [[Shopify_Integration#Settings | below]] if you need details on what each of these settings does. |
When you are finished with the settings, click ''Next''. | When you are finished with the settings, click ''Next''. | ||
| Line 61: | Line 118: | ||
==Shopify Panel in HandiFox== | ==Shopify Panel in HandiFox== | ||
| − | Once the integration with Shopify is set up, the Shopify panel will be located under ''Integrations → Shopify''. It serves to manage the products and orders loaded from Shopify, resolve issues and control the integration settings. | + | Once the integration with Shopify is set up, the Shopify panel will be located under ''Integrations → Shopify''. It serves '''to manage the products and orders''' loaded from Shopify, resolve issues and control the integration settings. |
===Products=== | ===Products=== | ||
| Line 69: | Line 126: | ||
<br> | <br> | ||
| − | This tab lists all your products that HandiFox knows about. This includes products that | + | This tab lists all your products that HandiFox knows about. This includes products that exist in HandiFox, Shopify, or QuickBooks (if it is connected). |
| − | + | After setting up the integration with Shopify, this list will contain all products that were in Shopify at that moment. '''To load newly created Shopify products''', you can click ''Load From Shopify''. | |
The ''Status'' column shows whether an item has been mapped with any product in Shopify, or vice versa. | The ''Status'' column shows whether an item has been mapped with any product in Shopify, or vice versa. | ||
| − | Unless you've chosen otherwise in the settings, new HandiFox items will be automatically created for all Shopify products, and their status will be '''"Listed"'''. If a product exists in Shopify but not in HandiFox, its status will be '''"Not Listed in HandiFox"'''. If a product exists in HandiFox but not in Shopify, its status will be '''"Not Listed in Shopify"''' (this | + | Unless you've chosen otherwise in the settings, new HandiFox items will be automatically created for all Shopify products, and their status will be '''"Listed"'''. If a product exists in Shopify but not in HandiFox, its status will be '''"Not Listed in HandiFox"'''. If a product exists in HandiFox but not in Shopify, its status will be '''"Not Listed in Shopify"''' (this would also include products coming from QuickBooks). |
For HandiFox to be able to process a Shopify order, all products on this order must be mapped with HandiFox products (i.e. have the '''"Listed"''' status). | For HandiFox to be able to process a Shopify order, all products on this order must be mapped with HandiFox products (i.e. have the '''"Listed"''' status). | ||
| Line 96: | Line 153: | ||
===Orders=== | ===Orders=== | ||
| + | |||
| + | This tab lets you view and manage orders coming in from Shopify. | ||
| + | |||
| + | ====Loaded==== | ||
| + | |||
| + | This category lists unfulfilled orders from Shopify. All new orders placed and paid in Shopify will shortly be detected by HandiFox and added to this list (HandiFox checks for new Shopify orders hourly). You can click ''Load from Shopify'' to load any new orders immediately. | ||
<br> | <br> | ||
[[File:Hfo-web-shopify-panel-orders.png|thumb|none|800px|Shopify panel in HandiFox: Orders tab]] | [[File:Hfo-web-shopify-panel-orders.png|thumb|none|800px|Shopify panel in HandiFox: Orders tab]] | ||
<br> | <br> | ||
| + | |||
| + | For every order its '''fulfillment status''' and '''payment status''' is displayed, and you can '''filter''' the list by one or the other. | ||
| + | |||
| + | You can use the ''checkboxes'' in the leftmost column to '''mark multiple products''' on the list and apply ''Bulk Actions'' to them, such as marking the orders as fulfilled. | ||
| + | |||
| + | You can click [[File:Hfo-printer.PNG]] in any line of the list to '''print''' the given order. | ||
| + | |||
| + | ====Not Loaded==== | ||
| + | |||
| + | Sometimes Shopify orders '''cannot be loaded''' into HandiFox because of data conflicts, for example, when a product from the order is not listed in HandiFox. Such orders will display under the ''Not Loaded'' category: | ||
<br> | <br> | ||
| Line 105: | Line 178: | ||
<br> | <br> | ||
| − | === | + | If this category is showing a number next to its title, there are some orders that could not be loaded. You can switch to the ''Not Loaded'' category and '''review the issues''' with every order. |
| + | |||
| + | Click ''Show Details'' to list all found problems with a specific order. You can also click ''Details'' for further information on the issue and ways for solving it. | ||
| + | |||
| + | Once all problems have been solved for at least one order from this list, you can try to ''Load Orders with Issues Again''. | ||
| + | |||
| + | ====Order Fulfillment==== | ||
| + | |||
| + | Once successfully loaded into HandiFox, orders from Shopify can be processed in the [https://play.google.com/store/apps/details?id=com.tecomgroup.handifoxonline HandiFox Online mobile app] in the same manner as all other sales orders. See [[Sales Orders]] and [[Picking and Packing]] for more information. | ||
| − | + | After an order has been '''picked and packed''' in HandiFox, it will be '''marked as fulfilled''' in Shopify. | |
===Settings=== | ===Settings=== | ||
| + | |||
| + | On the Settings tab you can control how HandiFox processes products and orders from Shopify and how data conflicts are resolved. You are also required to define these settings when first setting up the Shopify integration. | ||
<br> | <br> | ||
| Line 115: | Line 198: | ||
<br> | <br> | ||
| − | = | + | The table below describes the meaning of each setting and how it affects your data. |
| + | <br><br> | ||
| + | |||
| + | <table style="border: 1px solid black; border-collapse: collapse;"> | ||
| − | ... | + | <tr> |
| + | <th style="border: 1px solid black; padding: 3px;">Setting Name</th> | ||
| + | <th style="border: 1px solid black; padding: 3px;">Available Options</th> | ||
| + | <th style="border: 1px solid black; padding: 3px;">Description</th> | ||
| + | </tr> | ||
| + | |||
| + | <tr> | ||
| + | <td style="border: 1px solid black; padding: 3px;"> | ||
| + | Import Shopify Order when it is... | ||
| + | </td> | ||
| + | <td style="border: 1px solid black; padding: 3px;"> | ||
| + | *Paid | ||
| + | *Created (temporarily disabled) | ||
| + | </td> | ||
| + | <td style="border: 1px solid black; padding: 3px;"> | ||
| + | Defines when a new order from Shopify gets loaded into HandiFox. | ||
| + | </td> | ||
| + | </tr> | ||
| + | |||
| + | <tr> | ||
| + | <td style="border: 1px solid black; padding: 3px;"> | ||
| + | Default Customer, if empty | ||
| + | </td> | ||
| + | <td style="border: 1px solid black; padding: 3px;"> | ||
| + | Any of HandiFox/QuickBooks customers | ||
| + | </td> | ||
| + | <td style="border: 1px solid black; padding: 3px;"> | ||
| + | The customer that will be used by default for orders coming in from Shopify with no customer specified. | ||
| + | </td> | ||
| + | </tr> | ||
| + | |||
| + | <tr> | ||
| + | <td style="border: 1px solid black; padding: 3px;"> | ||
| + | Default HandiFox Location for Orders | ||
| + | </td> | ||
| + | <td style="border: 1px solid black; padding: 3px;"> | ||
| + | Any of HandiFox inventory sites | ||
| + | </td> | ||
| + | <td style="border: 1px solid black; padding: 3px;"> | ||
| + | The site that new Shopify orders will be associated with. | ||
| + | </td> | ||
| + | </tr> | ||
| + | |||
| + | <tr> | ||
| + | <td style="border: 1px solid black; padding: 3px;"> | ||
| + | Cash payment method | ||
| + | </td> | ||
| + | <td style="border: 1px solid black; padding: 3px;"> | ||
| + | Any payment method that exists in HandiFox/QuickBooks | ||
| + | </td> | ||
| + | <td style="border: 1px solid black; padding: 3px;"> | ||
| + | The payment method that corresponds to Shopify's Cash payment method | ||
| + | </td> | ||
| + | </tr> | ||
| + | |||
| + | <tr> | ||
| + | <td style="border: 1px solid black; padding: 3px;"> | ||
| + | Credit card payment method | ||
| + | </td> | ||
| + | <td style="border: 1px solid black; padding: 3px;"> | ||
| + | Any payment method that exists in HandiFox/QuickBooks | ||
| + | </td> | ||
| + | <td style="border: 1px solid black; padding: 3px;"> | ||
| + | The payment method that corresponds to Shopify's Credit Card payment method | ||
| + | </td> | ||
| + | </tr> | ||
| + | |||
| + | <tr> | ||
| + | <td style="border: 1px solid black; padding: 3px;"> | ||
| + | For unrecognized items in Shopify... | ||
| + | </td> | ||
| + | <td style="border: 1px solid black; padding: 3px;"> | ||
| + | *Create new items in HandiFox (default) | ||
| + | *Let me handle such cases manually | ||
| + | </td> | ||
| + | <td style="border: 1px solid black; padding: 3px;"> | ||
| + | What HandiFox should do when it encounters an unfamiliar product in Shopify and there is no product found in HandiFox with a matching name. If the second option is selected, you will be able to define the matching product on the HandiFox side on the ''Products'' tab. | ||
| + | </td> | ||
| + | </tr> | ||
| + | |||
| + | <tr> | ||
| + | <td style="border: 1px solid black; padding: 3px;"> | ||
| + | For unrecognized items in Shopify... | ||
| + | </td> | ||
| + | <td style="border: 1px solid black; padding: 3px;"> | ||
| + | *Create new items in Shopify | ||
| + | *Let me handle such cases manually (default) | ||
| + | </td> | ||
| + | <td style="border: 1px solid black; padding: 3px;"> | ||
| + | What HandiFox should do with its products that don't exist in Shopify and there is no product found in Shopify with a matching name. If the second option is selected, you will be able to define the matching product on the Shopify side on the ''Products'' tab. | ||
| + | </td> | ||
| + | </tr> | ||
| + | |||
| + | <tr> | ||
| + | <td style="border: 1px solid black; padding: 3px;"> | ||
| + | Default asset account for the items | ||
| + | </td> | ||
| + | <td style="border: 1px solid black; padding: 3px;"> | ||
| + | Depends on accounts that exist in HandiFox/QuickBooks | ||
| + | </td> | ||
| + | <td style="border: 1px solid black; padding: 3px;"> | ||
| + | Defines the asset account that HandiFox will use for Shopify products. | ||
| + | </td> | ||
| + | </tr> | ||
| + | |||
| + | <tr> | ||
| + | <td style="border: 1px solid black; padding: 3px;"> | ||
| + | Default income account for the items | ||
| + | </td> | ||
| + | <td style="border: 1px solid black; padding: 3px;"> | ||
| + | Depends on accounts that exist in HandiFox/QuickBooks | ||
| + | </td> | ||
| + | <td style="border: 1px solid black; padding: 3px;"> | ||
| + | Defines the income account that HandiFox will use for Shopify products. | ||
| + | </td> | ||
| + | </tr> | ||
| + | |||
| + | <tr> | ||
| + | <td style="border: 1px solid black; padding: 3px;"> | ||
| + | Default expense account for the items | ||
| + | </td> | ||
| + | <td style="border: 1px solid black; padding: 3px;"> | ||
| + | Depends on accounts that exist in HandiFox/QuickBooks | ||
| + | </td> | ||
| + | <td style="border: 1px solid black; padding: 3px;"> | ||
| + | Defines the expense account that HandiFox will use for Shopify products. | ||
| + | </td> | ||
| + | </tr> | ||
| + | |||
| + | <tr> | ||
| + | <td style="border: 1px solid black; padding: 3px;"> | ||
| + | Some of the products may have titles longer than 100 characters, which isn't allowed. In such cases: | ||
| + | </td> | ||
| + | <td style="border: 1px solid black; padding: 3px;"> | ||
| + | *Create them in HandiFox with names truncated to 100 characters | ||
| + | *Skip them and let me specify shorter HandiFox names for them before they are added | ||
| + | </td> | ||
| + | <td style="border: 1px solid black; padding: 3px;"> | ||
| + | Defines how HandiFox will treat Shopify products with excessively long names if it was set to automatically create unrecognized items from Shopify. If the second option is selected, you will be able to resolve such conflicts individually on the ''Products'' tab. | ||
| + | </td> | ||
| + | </tr> | ||
| + | |||
| + | </table> | ||
| + | <br> | ||
| + | |||
| + | ====Tax Codes==== | ||
| + | |||
| + | In this section of the settings you can define tax codes that will be applied to sales order processed at every listed location. | ||
| + | |||
| + | To '''add a new tax location''', click Add Place, then select a ''country'', enter the ''State'' and the ''City'' and click ''Add''. | ||
| + | |||
| + | Ideally, you should add a location for '''every state and city where your company has presence''', and set appropriate tax codes for them. | ||
| + | |||
| + | After that, if a Shopify order has delivery state that matches one of your locations, the corresponding tax codes will be applied to it. Otherwise, the ''Default Items Tax'' and ''Default Shipping Tax'' will be used. | ||
| + | |||
| + | ===Log=== | ||
| + | |||
| + | The Log tab displays a log of all events that happen during data exchange between HandiFox and Shopify: what products and orders have been downloaded and other activity. It is primarily for troubleshooting purposes. | ||
Latest revision as of 22:20, 25 April 2023
Contents
Introduction
Integration with Shopify will allow you to use HandiFox for order fulfillment through the use of Picking and Packing feature. Products listed on an order can be scanned into the pick list to ensure that correct articles and quantities are shipped (see Picking and Packing and Barcoding). Once the order is picked and packed, HandiFox will mark the Shopify order as fulfilled, and an invoice will be generated in HandiFox.
Setting up the Integration
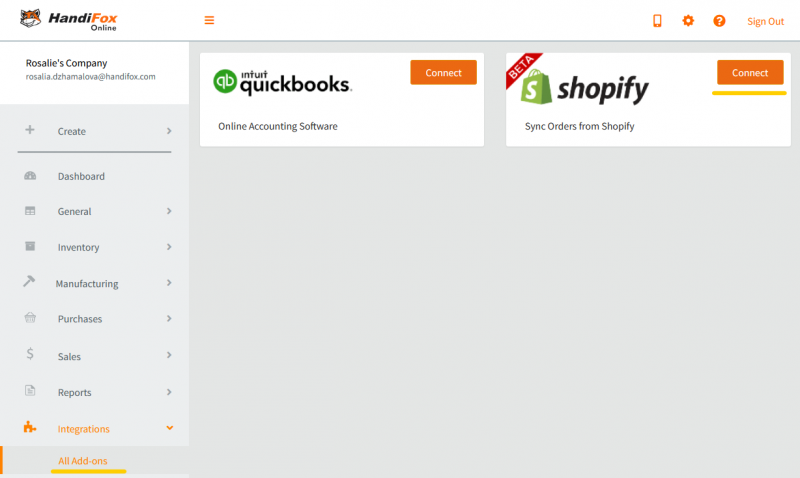
To connect your Shopify store with HandiFox, go to Integrations → All Add-ons and click Connect in the Shopify section.
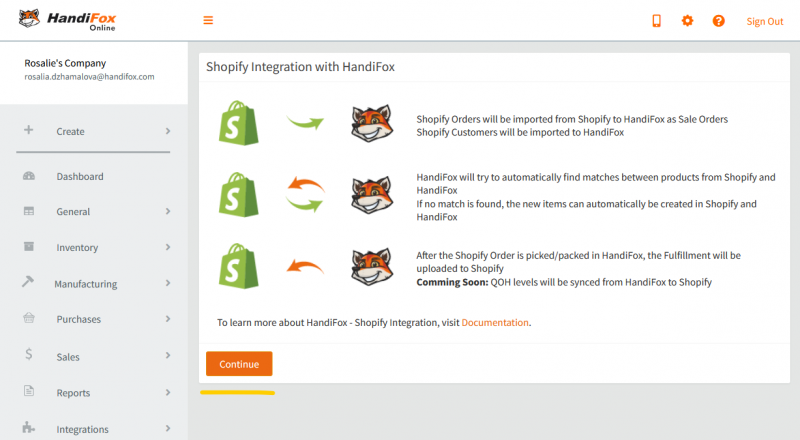
You will be presented with a brief description of what will happen with your Shopify data during the integration process. Review it, then click Continue.
Creating a Private App in Shopify
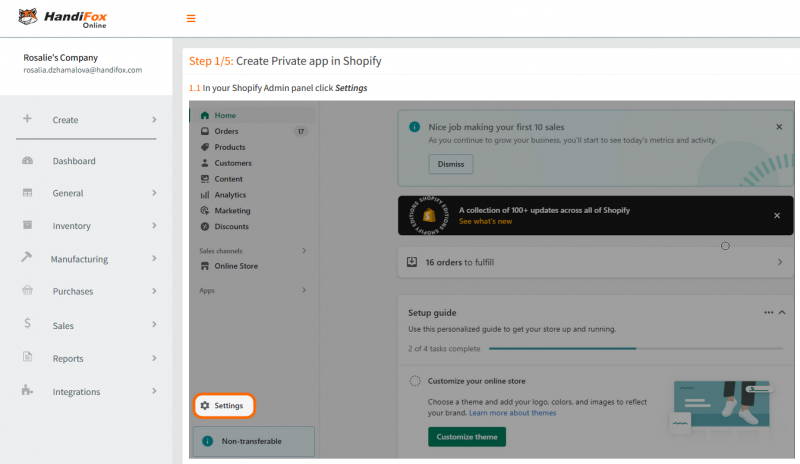
Sign into your Shopify account and create a new private app record for HandiFox as shown on the page. Click Next.
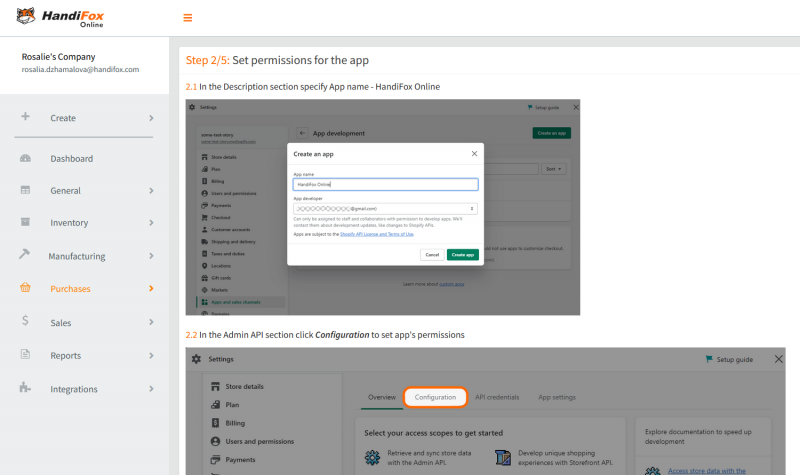
In Shopify, allow custom app development if required. Next, fill in the name and set the permissions for the private app, as shown on the page.
Make sure the admin API permissions for the app are set as follows:
| Permission | Access Level |
|---|---|
| Assigned fulfillment orders | Read and write |
| Customers | Read and write |
| Draft orders | Read and write |
| Fulfillment services | Read and write |
| Inventory | Read and write |
| Orders | Read and write |
| Products | Read and write |
| Third-party fulfillment orders | Read and write |
The remaining permissions can be left unchecked.
Click Next.
Connecting the App
After the private app creation is complete is Shopify, you will be able to see its API Key, the Password (Admin API access token), and the Shared Secret (API secret key) required for the connection. Copy this information into HandiFox. You will also need to enter your store's name, as seen in the browser's address bar.
When you have finished filling in the connection info, click Test Connection. If the test is successful, click Next to proceed. Otherwise, double-check the entered data and make sure everything is correct.
Filling in the Settings
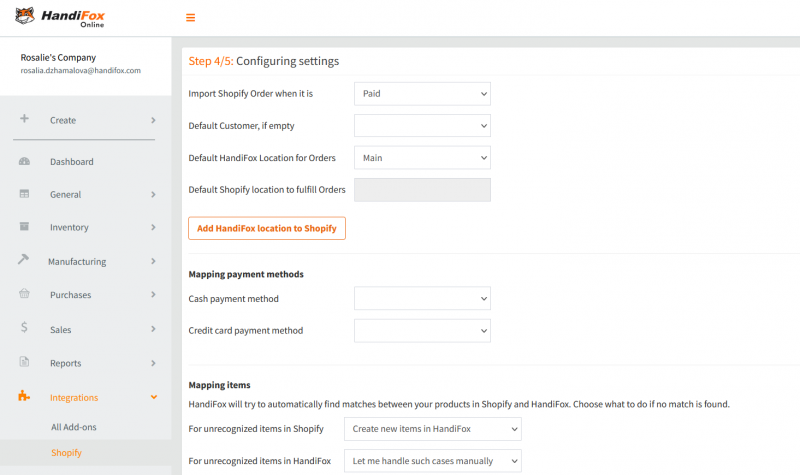
Now you need to fill in the integration settings which affect how products and orders from Shopify will be loaded into HandiFox. These settings will also be available in the Shopify Panel of HandiFox once the integration is set up. See below if you need details on what each of these settings does.
When you are finished with the settings, click Next.
Synchronizing
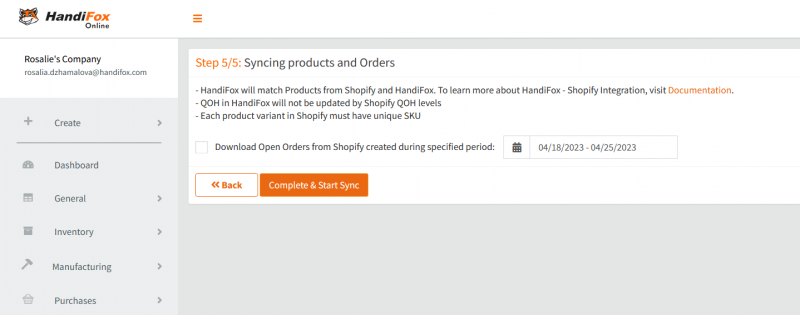
Now everything is ready for HandiFox to synchronize with Shopify and load its products. At this point you can also choose to download existing open orders from Shopify into HandiFox for a certain period (orders placed from this point onward will be added automatically).
When you are done, click Complete & Start Sync to finish the setup.
Shopify Panel in HandiFox
Once the integration with Shopify is set up, the Shopify panel will be located under Integrations → Shopify. It serves to manage the products and orders loaded from Shopify, resolve issues and control the integration settings.
Products
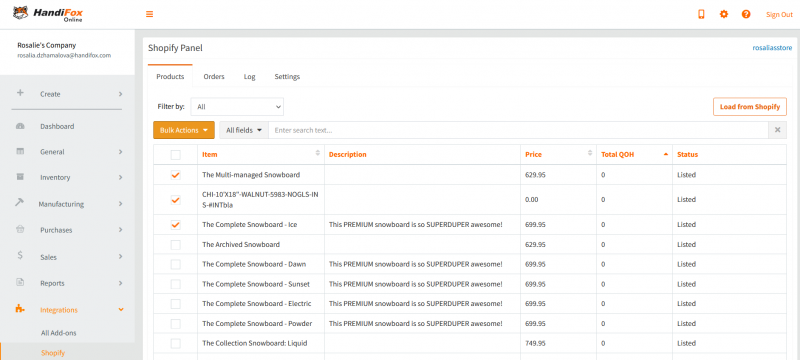
This tab lists all your products that HandiFox knows about. This includes products that exist in HandiFox, Shopify, or QuickBooks (if it is connected).
After setting up the integration with Shopify, this list will contain all products that were in Shopify at that moment. To load newly created Shopify products, you can click Load From Shopify.
The Status column shows whether an item has been mapped with any product in Shopify, or vice versa.
Unless you've chosen otherwise in the settings, new HandiFox items will be automatically created for all Shopify products, and their status will be "Listed". If a product exists in Shopify but not in HandiFox, its status will be "Not Listed in HandiFox". If a product exists in HandiFox but not in Shopify, its status will be "Not Listed in Shopify" (this would also include products coming from QuickBooks).
For HandiFox to be able to process a Shopify order, all products on this order must be mapped with HandiFox products (i.e. have the "Listed" status).
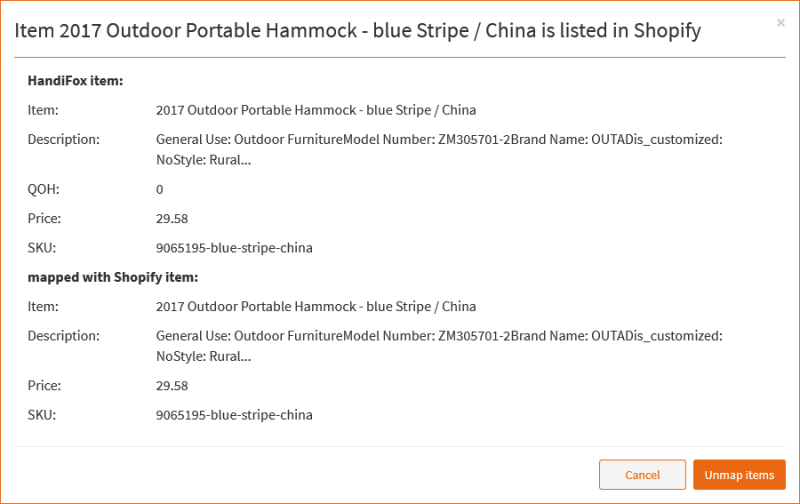
You can click on any list entry to view details about a given product and control its mapping to the corresponding Shopify product record.
If a product is listed in both HandiFox and Shopify, the product view will show its details and give you the option to Unmap it from its Shopify counterpart. The two product records can then be mapped to different products.
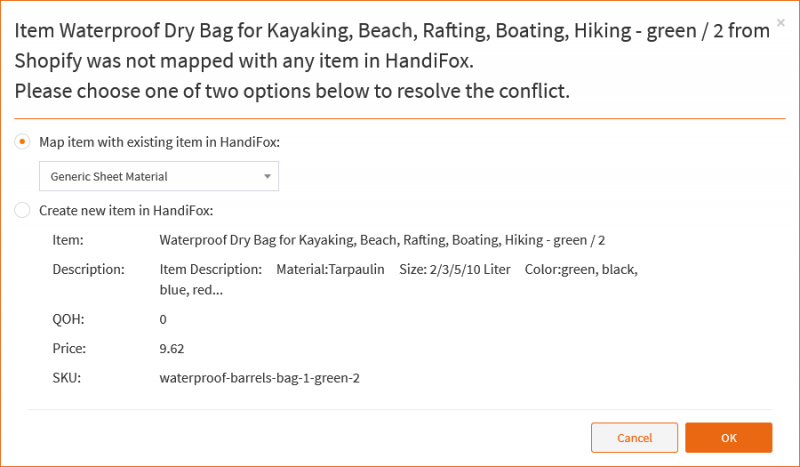
If the product you clicked exists only in Shopify but not in HandiFox (i.e. has the status "Not Listed in HandiFox"), you will be able to choose whether to create a new product in HandiFox automatically, or to map this product to one of the existing HandiFox items (that item must not be already mapped with any other product).
You can filter the products list by status using the "Filter by" field. You can display only Listed products, products that are Not Listed in HandiFox, or products that are Not Listed in Shopify.
Orders
This tab lets you view and manage orders coming in from Shopify.
Loaded
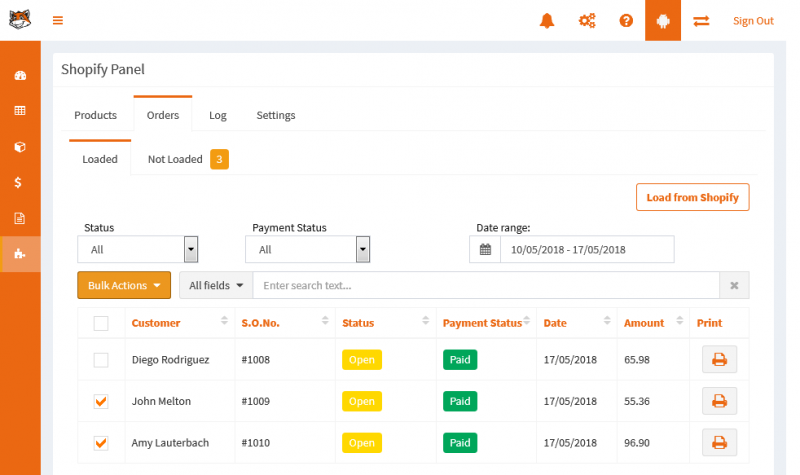
This category lists unfulfilled orders from Shopify. All new orders placed and paid in Shopify will shortly be detected by HandiFox and added to this list (HandiFox checks for new Shopify orders hourly). You can click Load from Shopify to load any new orders immediately.
For every order its fulfillment status and payment status is displayed, and you can filter the list by one or the other.
You can use the checkboxes in the leftmost column to mark multiple products on the list and apply Bulk Actions to them, such as marking the orders as fulfilled.
You can click in any line of the list to print the given order.
Not Loaded
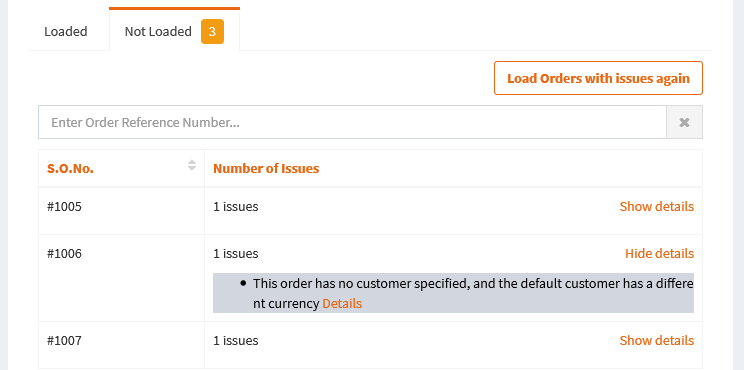
Sometimes Shopify orders cannot be loaded into HandiFox because of data conflicts, for example, when a product from the order is not listed in HandiFox. Such orders will display under the Not Loaded category:
If this category is showing a number next to its title, there are some orders that could not be loaded. You can switch to the Not Loaded category and review the issues with every order.
Click Show Details to list all found problems with a specific order. You can also click Details for further information on the issue and ways for solving it.
Once all problems have been solved for at least one order from this list, you can try to Load Orders with Issues Again.
Order Fulfillment
Once successfully loaded into HandiFox, orders from Shopify can be processed in the HandiFox Online mobile app in the same manner as all other sales orders. See Sales Orders and Picking and Packing for more information.
After an order has been picked and packed in HandiFox, it will be marked as fulfilled in Shopify.
Settings
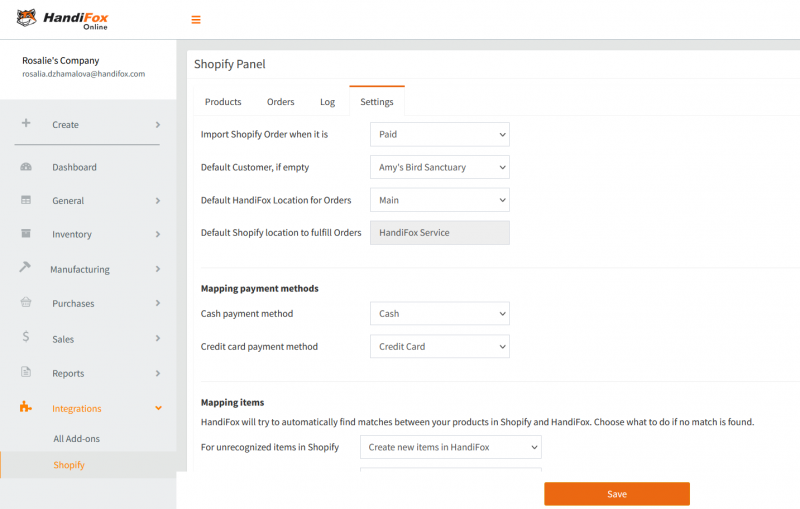
On the Settings tab you can control how HandiFox processes products and orders from Shopify and how data conflicts are resolved. You are also required to define these settings when first setting up the Shopify integration.
The table below describes the meaning of each setting and how it affects your data.
| Setting Name | Available Options | Description |
|---|---|---|
|
Import Shopify Order when it is... |
|
Defines when a new order from Shopify gets loaded into HandiFox. |
|
Default Customer, if empty |
Any of HandiFox/QuickBooks customers |
The customer that will be used by default for orders coming in from Shopify with no customer specified. |
|
Default HandiFox Location for Orders |
Any of HandiFox inventory sites |
The site that new Shopify orders will be associated with. |
|
Cash payment method |
Any payment method that exists in HandiFox/QuickBooks |
The payment method that corresponds to Shopify's Cash payment method |
|
Credit card payment method |
Any payment method that exists in HandiFox/QuickBooks |
The payment method that corresponds to Shopify's Credit Card payment method |
|
For unrecognized items in Shopify... |
|
What HandiFox should do when it encounters an unfamiliar product in Shopify and there is no product found in HandiFox with a matching name. If the second option is selected, you will be able to define the matching product on the HandiFox side on the Products tab. |
|
For unrecognized items in Shopify... |
|
What HandiFox should do with its products that don't exist in Shopify and there is no product found in Shopify with a matching name. If the second option is selected, you will be able to define the matching product on the Shopify side on the Products tab. |
|
Default asset account for the items |
Depends on accounts that exist in HandiFox/QuickBooks |
Defines the asset account that HandiFox will use for Shopify products. |
|
Default income account for the items |
Depends on accounts that exist in HandiFox/QuickBooks |
Defines the income account that HandiFox will use for Shopify products. |
|
Default expense account for the items |
Depends on accounts that exist in HandiFox/QuickBooks |
Defines the expense account that HandiFox will use for Shopify products. |
|
Some of the products may have titles longer than 100 characters, which isn't allowed. In such cases: |
|
Defines how HandiFox will treat Shopify products with excessively long names if it was set to automatically create unrecognized items from Shopify. If the second option is selected, you will be able to resolve such conflicts individually on the Products tab. |
Tax Codes
In this section of the settings you can define tax codes that will be applied to sales order processed at every listed location.
To add a new tax location, click Add Place, then select a country, enter the State and the City and click Add.
Ideally, you should add a location for every state and city where your company has presence, and set appropriate tax codes for them.
After that, if a Shopify order has delivery state that matches one of your locations, the corresponding tax codes will be applied to it. Otherwise, the Default Items Tax and Default Shipping Tax will be used.
Log
The Log tab displays a log of all events that happen during data exchange between HandiFox and Shopify: what products and orders have been downloaded and other activity. It is primarily for troubleshooting purposes.
