Products and Services
Before you can include any product in your transactions and other records, it has to exist as an item inside HandiFox. Items can be created inside HandiFox, or they can be loaded from a connected QuickBooks company or Shopify account.
Contents
Supported Item Types
HandiFox currently supports and lets you work with the following item types:
- Inventory
- Non-inventory
- Service


 Managing Products and Services
Both the web interface of HandiFox and the mobile app provide a way to review the items and do various operations with them.
 In the Web App
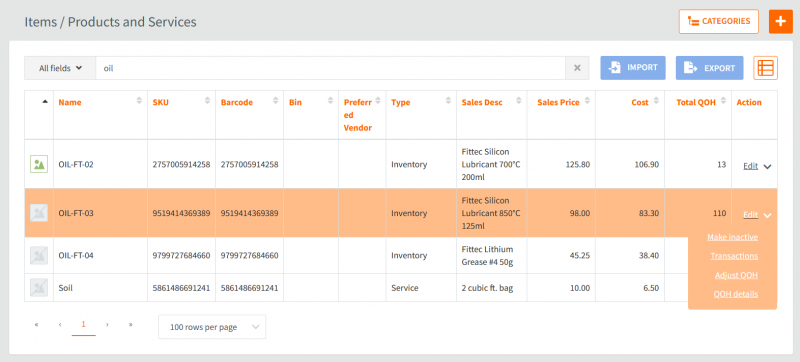
In the web app, you can manage items under Inventory → Item List.
You can filter items by Name, SKU, Barcode, Type, Sales Description, or All fields using the search field above the list. You can also sort the items by clicking on the desired column.
To manage what columns are shown on the page, click ![]() and check\uncheck the necessary ones. You can also show inactive items on the list by checking Include Inactive.
and check\uncheck the necessary ones. You can also show inactive items on the list by checking Include Inactive.
To create a new product or service, click ![]() and choose an item type. Next, enter the item's information(name, description, price, etc.). You can learn more here: Creating and Editing Items.
and choose an item type. Next, enter the item's information(name, description, price, etc.). You can learn more here: Creating and Editing Items.
To edit an item, click Edit in the corresponding row of the list. If the item you wish to edit is inactive, you need to re-activate it first.
You can adjust the quantity on hand for a specific item by clicking ![]() and selecting "Adjust QOH". Here you can enter the new quantities for this item on every inventory site in the New Qty column. This operation will create a new inventory adjustment transaction with just one item on it. Optionally, you can also specify a number and a memo for this adjustment transaction. When you are finished, click Save.
You can also access detailed information about the quantities of a specific item by clicking QOH details in the Action column.
and selecting "Adjust QOH". Here you can enter the new quantities for this item on every inventory site in the New Qty column. This operation will create a new inventory adjustment transaction with just one item on it. Optionally, you can also specify a number and a memo for this adjustment transaction. When you are finished, click Save.
You can also access detailed information about the quantities of a specific item by clicking QOH details in the Action column.
You can run a transactions report for a specific item to see all transactions that include it. To go to this report, click ![]() in the Action column and select "Transactions".
in the Action column and select "Transactions".
To make an item inactive, click ![]() in the Action column, choose "Make inactive", then click OK to confirm. If the item has any sub-items, they will be made inactive as well.
in the Action column, choose "Make inactive", then click OK to confirm. If the item has any sub-items, they will be made inactive as well.
Exporting and Importing Items
To export your item list to a spreadsheet, click Export, choose a format (XLS or CSV) and click Export again. Only the active items will be exported. You will receive the resulting document as a file download, which will be handled depending on your browser's behavior - typically you can choose whether to open the file or save it.
To import new items into the system, click Import and choose a file to import from (it can be an Excel spreadsheet or a CSV file). Click Next. On the following screen, set what fields will be populated from what columns in the spreadsheet (i.e. the Name column corresponds with the Full Name column in the spreadsheet, etc.). HandiFox will try to determine this automatically based on column names, but you should review the list yourself to make sure everything is correct. Click Next and wait for HandiFox to process the file. On the following screen, you will see the full list of all records to be imported. If any of them have errors, hover your mouse over the "Error" label to see what the problem is. Finally, click Import to add all eligible product records into HandiFox.

 In the Mobile App
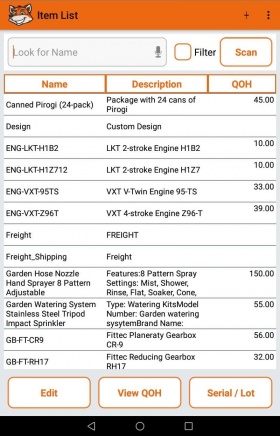
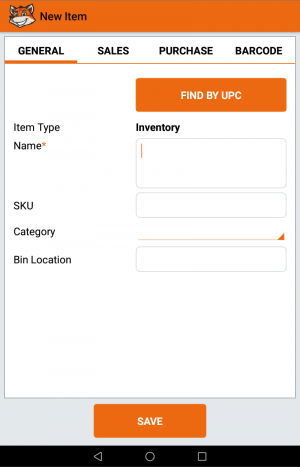
In the Android app, you can review all your products and services in the Inventory → Item List section. This list functions similarly to the Item List in the web app. Here you can review existing items and their quantities on hand (when applicable) and view the item's attributes. You can also add new items by tapping ![]() in the top-right corner of the screen, then selecting the item type (Inventory, Service, or Non-Inventory), and then filling out the necessary info across the tabs in the New Item screen. Here you can also enter or scan a UPC code of your item, if applicable, so that some information may be downloaded automatically. You can also edit an existing item by selecting it and tapping Edit.
in the top-right corner of the screen, then selecting the item type (Inventory, Service, or Non-Inventory), and then filling out the necessary info across the tabs in the New Item screen. Here you can also enter or scan a UPC code of your item, if applicable, so that some information may be downloaded automatically. You can also edit an existing item by selecting it and tapping Edit.
-
NOTE: Pictures for products are downloaded once you access them and are stored in the memory of your device. You can manage the image storage size by going to Admin → Settings → Select image storage size. By default, it is set to 100 MB.
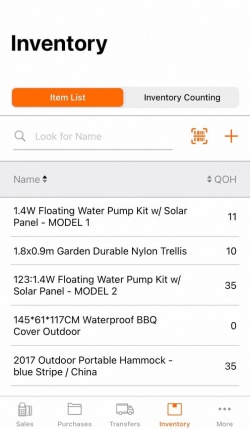
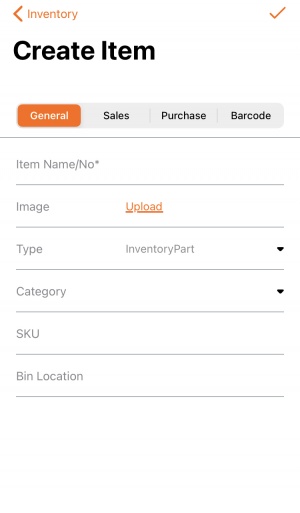
In the iOS app, you can review all your products and services in the Inventory → Item List tab. This list functions similarly to the Item List in the web app. Here you can review existing items and their quantities on hand (when applicable) and view the item's attributes. You can also add new items by tapping ![]() next to the Search field, then selecting the item type (Inventory, Service, or Non-Inventory), and then filling out the necessary info across the tabs in the Create Item screen. You can also edit an existing item by tapping it and tapping Edit.
next to the Search field, then selecting the item type (Inventory, Service, or Non-Inventory), and then filling out the necessary info across the tabs in the Create Item screen. You can also edit an existing item by tapping it and tapping Edit.


 Creating and Editing Items
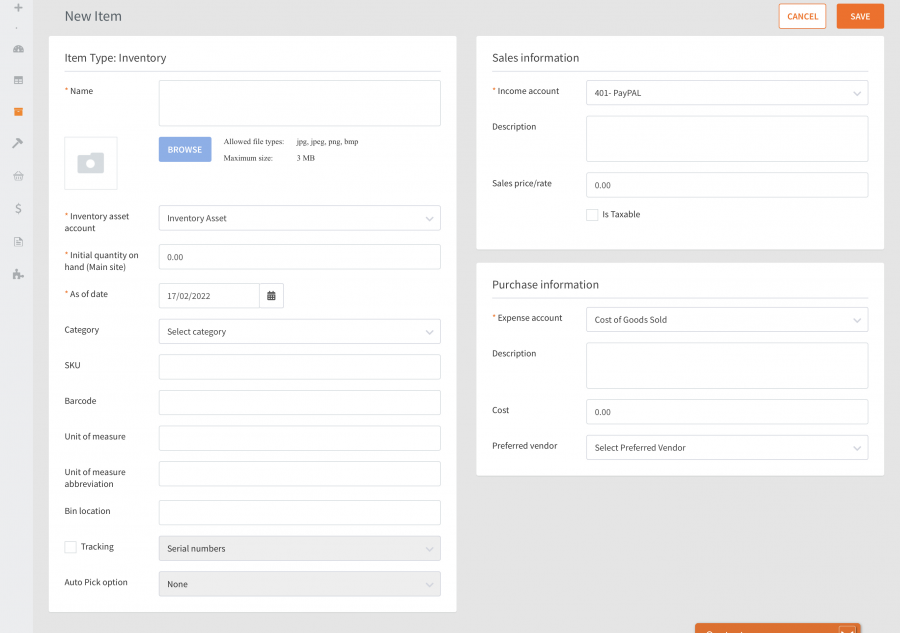
Here is a breakdown of the details that you can define for your items. The required fields are marked by an asterisk on the screen.
Item Information
- Name: This field allows setting the name of the item. Please note that it is impossible to save an item with exactly the same full name as your already existing item has.
- Picture: By clicking Browse you can add a picture for the item. Select the necessary picture in jpg, jpeg, png, or bmp with a maximum size of 3 MB. If your company is connected to QuickBooks Online, the picture will be uploaded to it (or vice versa).
- Inventory Asset: This option is shown only if your company is connected to QuickBooks Online. You can select among your QuickBooks accounts that are of the Current assets type and the Inventory detail type.
- Initial quantity on hand (Main site): This field is set to 0.00 by default and cannot be negative.
- As of date: This field allows you to set the date when you start tracking the quantity on hand of an inventory item. Note that you cannot create transactions with the item whose quantity you started tracking after the date of the transaction.
- Category: This optional field allows you to put the item in the existing category. You can manage categories on the Item List page if you run HandiFox as a standalone system, or manage them in your connected QuickBooks Online company.
- SKU: This field allows you to set an SKU for the item, with a maximum length of 100 characters.
- Barcode: Here you can set the barcode of the item, with a maximum length of 100 characters.
- Unit of measure: Allows typing in the name of the desired unit of measure.
- Unit of measure abbreviation: Allows typing the abbreviation of the desired unit of measure.
- Bin location: Here you can set the name of the item's Bin location.
- Tracking: This checkbox allows you to enable tracking of the item by Serial numbers, Lot numbers, and Expiration Dates. You can always enable tracking afterward, however, please note that it is not possible to turn tracking off once it's been set. You can learn more about this feature here: Serial, Lot Number and Expiration Date Tracking
- Auto-pick option: This allows you to choose the criterion by which the tracked items can be auto-picked in transactions.
Sales Information
- Income account: This option is available only if your company is connected to QuickBooks Online. If this is an inventory item, you can select among your QuickBooks accounts that are of the Income type and the Sales of Product Income detail type. All types of accounts are available for service and non-inventory items.
- Description: Here you can add a sales description of your item, with a maximum length of 4000 characters.
- Sales price/rate: This field allows you to set the sales price/rate for an item, it is set to 0.00 by default.
- Is taxable: This checkbox is available for US companies when taxes are enabled. It allows defining if the item is taxable or not by default in sales transactions.
- Inclusive of tax: This checkbox is available for non-US companies when taxes are enabled. The default value is defined in the Tax Settings.
- Tax: This option is available for non-US companies when taxes are enabled. You can choose among taxes that are defined in the Tax Settings.
Purchase Information
- Expense account: This option is available only if your company is connected to QuickBooks Online. If this is an inventory item, you can select among your QuickBooks accounts that are of the Cost of Goods Sold type and the Supplies and materials - COS detail type. All types of accounts are available for service and non-inventory items.
- Description: Here you can add a purchase description of your item, with a maximum length of 4000 characters.
- Cost: This field allows you to set the cost for an item, it is set to 0.00 by default.
- Inclusive of purchase tax: This checkbox is available for non-US companies when taxes are enabled. The default value is defined in the Tax Settings.
- Purchase tax: This option is available for non-US companies when taxes are enabled. You can choose among taxes that are defined in the Tax Settings.
- Preferred vendor: This option allows you to select a preferred vendor among your active vendors.
