Difference between revisions of "Products and Services"
(→Supported Item Types: Add warning) |
(→Exploring Products and Services: Add QOH adjustments and importing) |
||
| Line 10: | Line 10: | ||
{{Warning | If you have a QuickBooks company connected, and your QuickBooks subscription does not allow Inventory Part type items, you will not be able to create them in HandiFox either.}} | {{Warning | If you have a QuickBooks company connected, and your QuickBooks subscription does not allow Inventory Part type items, you will not be able to create them in HandiFox either.}} | ||
| − | == | + | == Managing Products and Services == |
Both the web interface of HandiFox and the mobile app provide a way to review the items and do various operations with them. | Both the web interface of HandiFox and the mobile app provide a way to review the items and do various operations with them. | ||
| Line 16: | Line 16: | ||
=== In the Web App === | === In the Web App === | ||
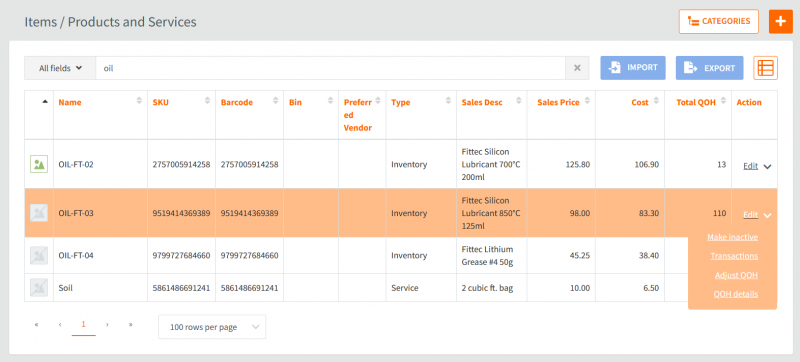
| − | [[File:Hfo-web-item-list.png|thumb|none| | + | [[File:Hfo-web-item-list.png|thumb|none|800px|The Item List page in HandiFox Online web app]] |
In the web app, you can manage items under ''Inventory → Item List''. | In the web app, you can manage items under ''Inventory → Item List''. | ||
| Line 22: | Line 22: | ||
You can search by item details (name, description, etc.) using the search field above the list. | You can search by item details (name, description, etc.) using the search field above the list. | ||
| − | |||
'''To create a new product or service''', click [[File:Hfo-plus-button.png]] and choose an item type. Next, enter the item information (name, description, price, etc.) and click ''Save''. | '''To create a new product or service''', click [[File:Hfo-plus-button.png]] and choose an item type. Next, enter the item information (name, description, price, etc.) and click ''Save''. | ||
| − | + | ||
'''To edit an item''', click ''Edit'' in the corresponding row of the list. If the item you wish to edit is inactive, you will have to re-activate it first. | '''To edit an item''', click ''Edit'' in the corresponding row of the list. If the item you wish to edit is inactive, you will have to re-activate it first. | ||
| − | + | ||
| + | You can '''adjust the quantity on hand''' for a specific item by clicking [[File:Hfo-dropdown.png]] and selecting ''"Adjust QOH"''. Here you can enter the new quantities for this item on every inventory site in the ''New Qty'' column. This operation will create a new inventory adjustment transaction with just one item on it. Optionally, you can also specify a ''number'' and a ''memo'' for this adjustment transaction. When you are finished, click ''Save''. | ||
| + | |||
| + | You can '''run a transactions report''' for a specific item to see all transactions that include it. To go to this report, click [[File:Hfo-dropdown.png]] in the ''Action'' column and select ''"Transactions"''. | ||
| + | |||
'''To make an item inactive''', click [[File:Hfo-dropdown.png]] in the ''Action'' column, choose ''"Make inactive"'', then click ''OK'' to confirm. | '''To make an item inactive''', click [[File:Hfo-dropdown.png]] in the ''Action'' column, choose ''"Make inactive"'', then click ''OK'' to confirm. | ||
| − | + | ||
| − | + | '''To make inactive items show on the list''', click [[File:Hfo-gear-button.png]] and turn on the ''Include Inactive'' checkbox that appears. | |
| − | + | ||
| + | ====Exporting and Importing Items==== | ||
| + | |||
'''To export your item list to a spreadsheet''', click ''Export'', choose a format (XLS or CSV) and click ''Export'' again. You will receive the resulting document as a file download, which will be handled depending on your browser's behavior. Typically you can choose whether to open the file or save it. Only the active items will be exported. | '''To export your item list to a spreadsheet''', click ''Export'', choose a format (XLS or CSV) and click ''Export'' again. You will receive the resulting document as a file download, which will be handled depending on your browser's behavior. Typically you can choose whether to open the file or save it. Only the active items will be exported. | ||
| − | + | ||
| − | '''To | + | '''To import new items''' into the system, click ''Import'' and choose a file to import from (it can be an Excel spreadsheet or a CSV file). Click ''Next''. On the next screen you can set what fields will be populated from what columns in the spreadsheet. HandiFox will try to determine this automatically based on column names, but you should review the list yourself and make sure everything is correct. Click ''Next'' and wait for HandiFox to process the file. On the next screen you will see the full list of all records to be imported. If any of them has errors, hover your mouse over the "Error" label to see what the problem is. Finally, click ''Import'' to add all eligible product records into HandiFox. |
| − | |||
=== In the Mobile App === | === In the Mobile App === | ||
Revision as of 19:43, 4 July 2019
Before you can include any product in your transactions and other records, it has to exist as an item inside HandiFox. Items can be created inside HandiFox, or they can be loaded from a connected QuickBooks company or Shopify account.
Contents
Supported Item Types
HandiFox currently supports and lets you work with the following item types:
- Inventory
- Non-inventory
- Service
Managing Products and Services
Both the web interface of HandiFox and the mobile app provide a way to review the items and do various operations with them.
In the Web App
In the web app, you can manage items under Inventory → Item List.
You can search by item details (name, description, etc.) using the search field above the list.
To create a new product or service, click ![]() and choose an item type. Next, enter the item information (name, description, price, etc.) and click Save.
and choose an item type. Next, enter the item information (name, description, price, etc.) and click Save.
To edit an item, click Edit in the corresponding row of the list. If the item you wish to edit is inactive, you will have to re-activate it first.
You can adjust the quantity on hand for a specific item by clicking ![]() and selecting "Adjust QOH". Here you can enter the new quantities for this item on every inventory site in the New Qty column. This operation will create a new inventory adjustment transaction with just one item on it. Optionally, you can also specify a number and a memo for this adjustment transaction. When you are finished, click Save.
and selecting "Adjust QOH". Here you can enter the new quantities for this item on every inventory site in the New Qty column. This operation will create a new inventory adjustment transaction with just one item on it. Optionally, you can also specify a number and a memo for this adjustment transaction. When you are finished, click Save.
You can run a transactions report for a specific item to see all transactions that include it. To go to this report, click ![]() in the Action column and select "Transactions".
in the Action column and select "Transactions".
To make an item inactive, click ![]() in the Action column, choose "Make inactive", then click OK to confirm.
in the Action column, choose "Make inactive", then click OK to confirm.
To make inactive items show on the list, click ![]() and turn on the Include Inactive checkbox that appears.
and turn on the Include Inactive checkbox that appears.
Exporting and Importing Items
To export your item list to a spreadsheet, click Export, choose a format (XLS or CSV) and click Export again. You will receive the resulting document as a file download, which will be handled depending on your browser's behavior. Typically you can choose whether to open the file or save it. Only the active items will be exported.
To import new items into the system, click Import and choose a file to import from (it can be an Excel spreadsheet or a CSV file). Click Next. On the next screen you can set what fields will be populated from what columns in the spreadsheet. HandiFox will try to determine this automatically based on column names, but you should review the list yourself and make sure everything is correct. Click Next and wait for HandiFox to process the file. On the next screen you will see the full list of all records to be imported. If any of them has errors, hover your mouse over the "Error" label to see what the problem is. Finally, click Import to add all eligible product records into HandiFox.
In the Mobile App
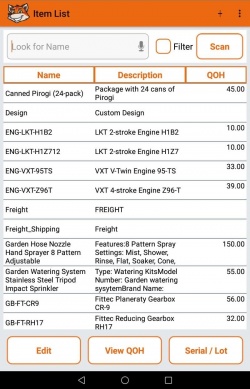
In the mobile app, you can review all your products and services in the Inventory → Item List section. This list functions similarly to the Item List in the web app, except that you can't edit item properties or create new items. Here you can review existing items and their quantities on hand (when applicable) and view item attributes.

